
What you will get
A student registered and already able to reach the portal, in under a minute. The path is Students in the left menu, then the blue Add Student button on the right.
Of the eight fields on the screen, only two are always required. The rest depend on what your school demands — and you are the one who decides that.
Step by step
1. Open Students › Add Student.
2. Fill in the full name. It is the one field that is never optional. It goes into the contract and into every email, so write it the way the student signs.
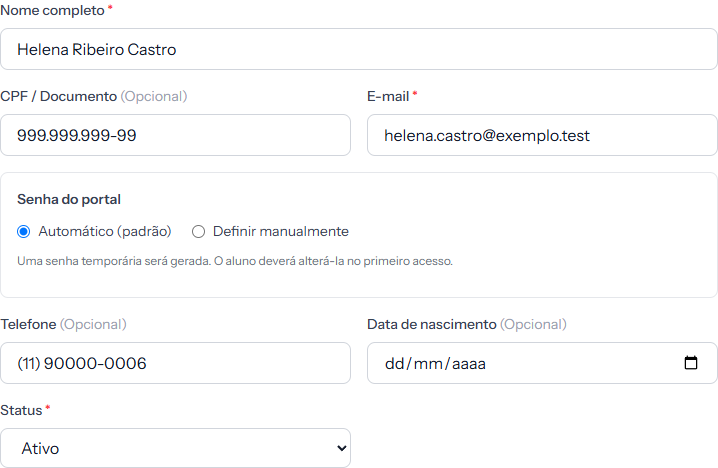 The red star marks what is required. Notice the ID here is marked (Optional) and the email has a star — that comes from your settings, and at your school it may be the other way around.
3. Fill in whatever your school demands. The red star shows which ones. The Student Portal tab inside Settings decides it:
| What you turned on there | What becomes required here |
|---|---|
| Login identifier: Email | The email |
| Login identifier: Document (CPF) | The ID |
| Document required | The ID, even when login is by email |
| Phone required | The phone |
| Address required | Street, number, neighborhood, city and state |
4. Choose how the portal password works. The default is Automatic (default): the system creates a temporary password and emails it. To hand the password over yourself, pick Set manually and type one with at least 8 characters.
Either way, the student is forced to change it on first login.
5. Leave the status as Active and click Create.
The address fills itself in
In the address block, type the ZIP code and leave the field. Street, neighborhood, city and state come back filled in.
Pick the city from the list the system offers instead of typing over it: that is how the record stores the official city code that documents use later.
How you know it worked
The screen switches to the student record, with the green banner Student created successfully. And in that record, Portal access already shows the student's email or ID — the sign that the login account was born alongside it.
If the student has an email, the message with the portal address and the temporary password goes out right away.
If something goes wrong
The message says the document has already been taken. That ID already belongs to another student at your school. The article on the student's ID, right next to this one, shows how to find who.
Portal access came out as "No access". The field your school uses as the login was left empty. Without it the system has nothing to build the account from.
The system said the student limit was reached. Your EduPay plan has a cap on registrations. The message tells you the number, and My Subscription is where plans change.
You have many people to register at once. Do not do them one by one — the Import Students (CSV) button, right beside the one you used, handles a whole class in one go.
Reviewed on · view as plain text