
What you will get
A student enrolled, with the contract generated, the payment book built and the first charges already issued. The path is Contracts › Enrollments and the blue New Enrollment button.
The form has five numbered steps, each opening only after the previous one. On the right, a panel keeps summarising what you picked.
Before you start
Four things have to exist:
- The student, under Students.
- The product — an offering or a trail, under Academic.
- The financial plan, under Contracts › Financial Plans.
- The contract template, if your school uses contracts.
Miss any one and the matching step comes up empty.
Step 1 · Who is being enrolled
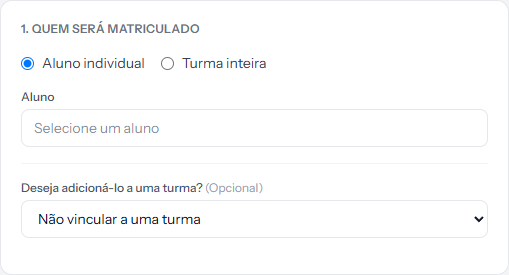 The choice at the top changes everything that follows. Turma inteira — whole cohort — enrols every student on a cohort's list in one go.
For the common case, leave it on the individual option and pick the person in the Aluno field — it searches by name or ID.
Below it sits the optional cohort field. It is worth picking one: the cohort goes into the contract, drives the first instalment's date, and is what carries the student into the class environment.
Step 2 · Product
Two tabs: Oferta and Trilhas — offering and trails. Pick what is being sold.
Step 3 · Contract template (Optional)
Here is the decision that changes the enrolment's course. Pick a template that requires a signature and the enrolment is born awaiting the signature. Pick Sem contrato — no contract — and it is born cleared for payment.
Step 4 · Financial plan
Pick the plan and, just below, the payment method. Only the methods that plan accepts appear — and the chosen one must also be a method the school's receiving account can charge. If it is not, the enrolment is not saved.
Step 5 · Amounts
Two fields, both optional, both with a hint worth reading:
- Total value — blank uses the product's price.
- Enrollment fee — blank uses the plan's fee.
Careful: leaving the fee blank does not waive it. To charge no fee, type 0.
Finally, the optional notes field is free text, for internal use only.
The charges that go out straight away
On saving, the system already issues what has to go out now:
- Card: payment is available straight away, and the student gets a single email, with the button that leads to the portal. If there is an enrollment fee, it goes in the same email.
- Boleto and PIX: whatever falls due within the lead time set on the Billing tab goes out straight away — the enrollment fee, which falls due on the day, included. The rest is left to the daily routine.
If issuing fails, the enrolment still stands: the school owner gets the charge failure email, the daily routine tries the boleto and the PIX again, and on card the student opens the payment from the Pay with card button on the portal.
With no receiving account connected, nothing is issued.
Enrolling a whole cohort
Picking the cohort option in step 1, the system uses that cohort's student list — the one you build on the cohort's screen. Everyone gets the same enrolment: same product, same plan, same payment method.
What happens:
- If any student already has an active enrolment for that product, the system stops and shows the list of who is in that situation, for you to confirm first. Confirm and it enrols the rest, skipping those.
- At the end, the message counts both numbers: how many enrolments were made and how many were skipped for conflict.
- If the cohort's list is empty, the system refuses with This cohort has no students.
- The charges go out in the background, a few moments after the message, under the same rule as an individual enrolment.
Remember that a cohort's list is not the same thing as its enrolments. The hand-built list is what counts here.
How you know it worked
The screen goes to the new enrolment with the green banner Enrollment created successfully., and the instalment panel is already built below.
If something goes wrong
The message says the student already has an active enrolment for this product. That is the duplicate guard. The article on duplicate enrolments, next door, covers the routes.
The payment method you want is not there. It is not ticked on the chosen plan. Go back to step 4 and pick another plan.
On saving, "The selected payment method is not accepted by this financial plan." appears. The method is not ticked on the plan, or the receiving account cannot charge it. The Accepted payment methods box, under Integrations, shows what the account charges today. Pick another method.
A step will not open. It is waiting on the previous one. The right-hand panel shows what is missing.
The student, product or plan list is empty. Something was not registered beforehand. None of them can be created from here.
Reviewed on · view as plain text