
What you will get
A cohort ready to take students and to be picked on an enrolment. The path is Students › Cohorts and the blue New Cohort button.
Only the Name is required. Everything else is optional — but the dates are worth the effort, because they go into the contract.
Step by step
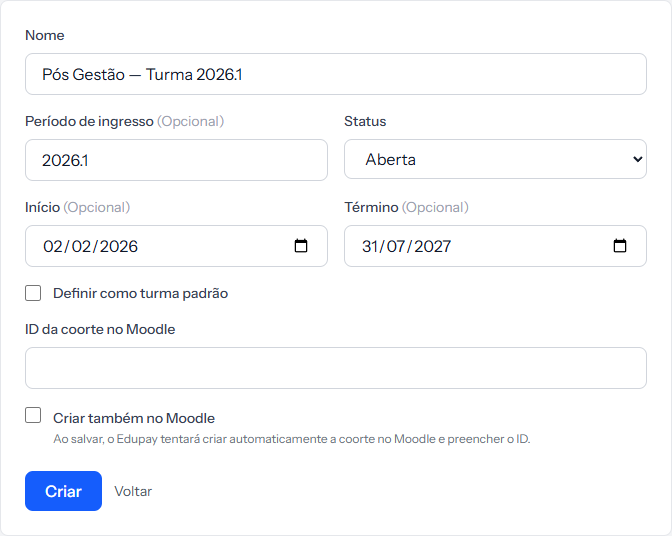 Five fields and two checkboxes. The Moodle options at the bottom only appear if you have connected the class environment.
1. Give it a name that reads on its own. A cohort is not tied to any course, and the name is all you have to recognise it later. Management Postgrad — 2026.1 works; Cohort 3 does not.
2. Fill in the Intake period if your school works that way. Free text, up to
20 characters — usually something like 2026.1 or Feb/2026. It gets its own
column on the list.
3. Leave the Status as Open. It is the only status in which a cohort is offered on an enrolment.
4. Set the Start date and End date. These two become contract variables: the template can print the course's start and end. The end cannot come before the start.
5. Click Create.
The default cohort
The Set as default cohort checkbox marks one cohort as the school's main one. Two things follow:
- There is only one per school. Marking another unmarks the previous one, without warning.
- It cannot be deleted. Its row on the list has no Delete button.
Every school is born with one: Turma Geral, created along with the account. If you do not organise by cohorts, you can leave everything in it and get on with life.
Cohorts and Moodle
Schools that connected the class environment see two more fields:
- Moodle cohort ID — the cohort on the other side that matches this one.
- Also create in Moodle — on save, EduPay tries to create the cohort itself and fill in the ID.
That ID is what makes student syncing work. Without it, the enrolment never reaches the class environment.
How you know it worked
The screen opens the new cohort with the green banner Cohort created successfully., showing Status, start, end and No. of Students at zero. With Moodle creation ticked, the message is different: Cohort created and linked to Moodle successfully.
If something goes wrong
The end date was refused. It cannot come before the start date.
You are looking for where to set the number of seats. That field does not exist. The system does not track cohort capacity.
You are looking for where to link the cohort to the course. That does not exist either. Cohorts and offerings are independent — the enrolment joins them.
The message says the Moodle cohort could not be created. The cohort was created anyway. Fill in the Moodle cohort ID by hand, under Edit.
Reviewed on · view as plain text