
What you will get
A whole class registered at once instead of one at a time. The import has two steps: upload the file, which is this article, and say what each column is, which is the next one.
The path is Students and the Import Students (CSV) button, next to the one that adds a single student.
Before you start
Have the spreadsheet saved as .csv or .txt, at most 10 MB. If yours is in Excel, use Save as and choose CSV.
The article on building the spreadsheet, right next to this one, lists the columns and the accepted formats. It is worth reading before your first import — after that, you already know.
Step by step
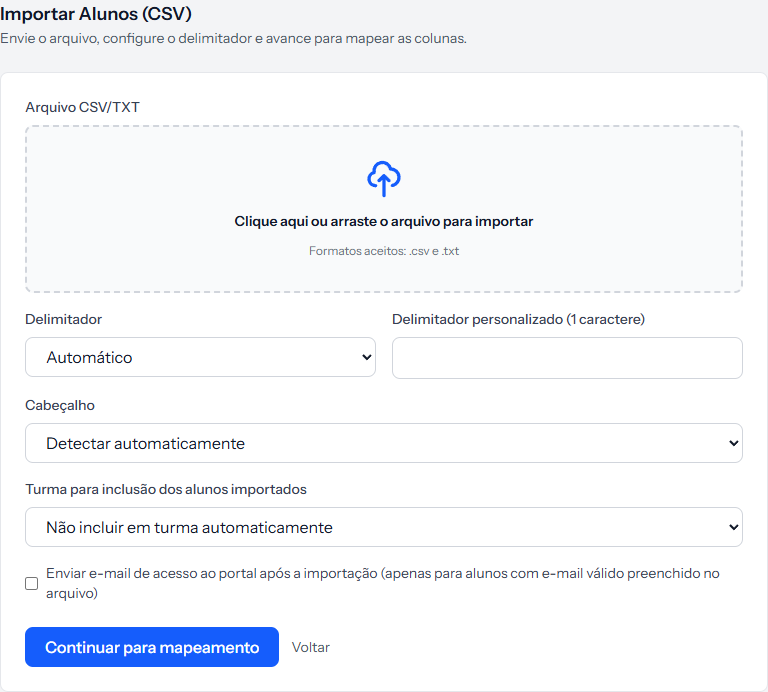 Only the file is required. The four fields below already come set the way that works for most spreadsheets.
1. Drop the file onto the dashed area or click it to pick from your computer. As soon as it lands the border turns green and the file name appears.
2. Leave the Delimiter on Automatic. That is the character separating the columns. The system usually works it out; use the list only when the preview on the next step comes out scrambled.
3. Leave the Header on Detect automatically. It recognises the first line as titles when it holds words like name, email or cpf. If your spreadsheet starts straight at the first student, choose No — otherwise the first person on the list is read as a title and never gets in.
4. Pick a cohort, if you want one. The Cohort to include imported students field drops everyone in the file into one cohort in a single move. Only open cohorts are listed.
That saves a fair amount of work: without it you would open cohort after cohort afterwards.
5. Decide about the access email. The Send portal access email after import box comes unticked. Ticked, every student with an email receives the portal address and the temporary password at the end.
Leave it off while you are only tidying up records and do not want anyone signing in yet.
6. Click Continue to mapping.
How you know it worked
The screen moves to the second step, telling you how many rows it found and showing two grey tags with the separator and the header it recognised. Nothing has been saved yet.
If something goes wrong
The file is empty or has no valid rows. The spreadsheet has only a header, or only blank lines. Check that you saved it after filling it in.
The upload was refused because of the format. The system takes .csv and .txt. Excel (.xlsx) and Google Sheets files have to be exported first.
The spreadsheet is too big. The cap is 10 MB, which is many thousands of students. If you hit it, there are probably empty rows or columns hanging beside your data — delete them and save again.
You chose Custom for the delimiter. Then the field beside it is required, and it takes exactly one character.
Reviewed on · view as plain text