
What you will get
The payment slip for one installment is ready in seconds, from the menu on that installment's own row. You use this path when a student asks for the charge before the date the system would issue it on its own, or when you have just created an enrollment and want to send the first charge now.
The system already issues slips automatically, a few days before each due date — and, when the enrollment is saved, whatever is already within that window goes out right away. This article is about doing it by hand, right now.
Before you start
Three things need to be in place. If any is missing, the button does not appear or the system tells you on the spot.
- The account that receives the school's money has to be connected. That is the account the students' payments go to. Whoever administers the EduPay account takes care of this.
- The installment has to be open or overdue. An installment that is already paid or cancelled cannot be charged again, and the actions menu does not even show up on its row.
- The installment has to be a payment slip one. The payment method is chosen when the enrollment is created and applies to all of its installments. On a card or instant-transfer enrollment, the menu offers that method instead. If the installment has no charge yet, the same menu shows Change to Bank slip, which switches the method of that installment only.
Step by step
1. Open the student's enrollment. In the side menu go to Contracts › Enrollments and click the student's row. If the list is long, use the search.
2. Scroll down to the installments panel. It sits below the enrollment details. Each row is one installment, with the amount, the due date and where it currently stands.
3. Click the three dots at the end of the installment's row. They are in the ACTIONS column, at the far right. A menu opens with what can be done to that installment.
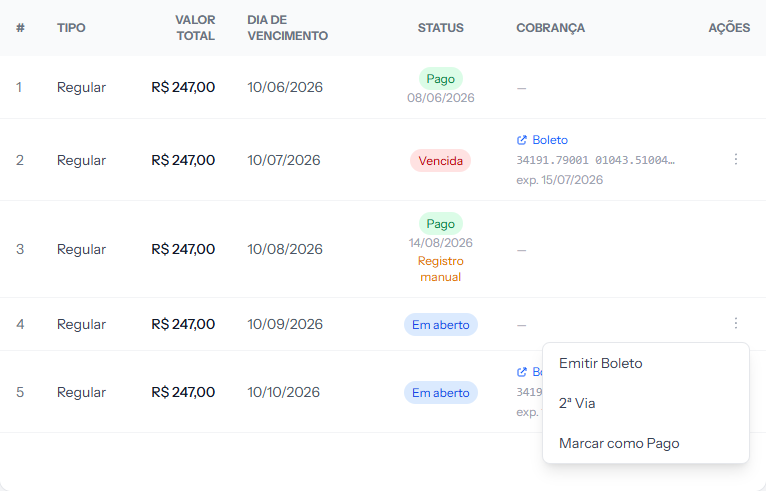 The three dots are in the ACTIONS column. Notice that installments 1 and 3, already paid, have no menu — a paid installment is not charged again.
4. Click Issue Boleto. There is no confirmation screen: the slip is generated straight away. Check that it is the right installment before clicking.
How to tell it worked
The message "Boleto issued successfully." appears at the top of the screen, and the CHARGE column on that row stops showing a dash. In its place you get three things: the Boleto link, the barcode line, and the expiry date.
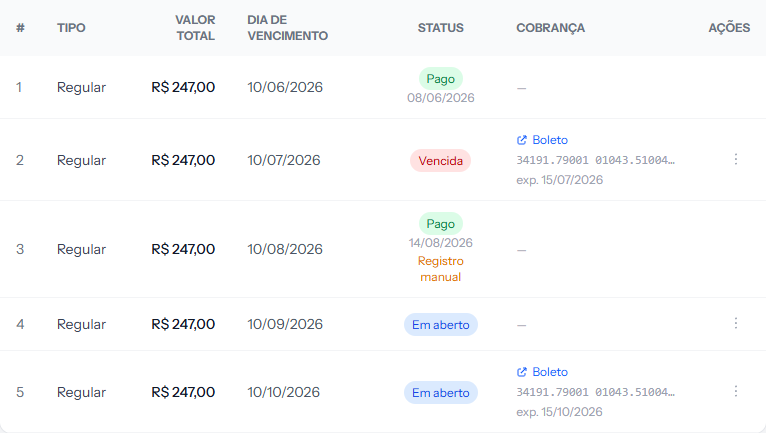 Installment 5 already has its slip. Notice that it still reads "Open" — it only turns to "Paid" once the money arrives.
One thing that tends to confuse people: the STATUS column does not change after you issue. The installment stays Open, because nobody has paid yet — issuing a slip is not receiving the money. What changes is the CHARGE column.
How long the slip is valid: until the installment's due date. If the installment falls due today or is already overdue, the slip is valid for 3 days. If it expires unpaid, the daily routine issues a new one on its own while the installment is open within the lead time or overdue by up to 7 days.
The student gets the slip by email and sees the same block in their own portal. And when the payment comes in, the system settles it on its own: you do not need to come back here to mark anything.
If something goes wrong
The message
Gateway não configuradoappeared. It means the account that receives the school's money has not been connected yet. Without it there is nowhere for the payment to go, and no slip can be generated. Ask whoever administers the EduPay account to connect it.The three-dot menu does not appear on the row. The installment is probably already paid or cancelled. Check the STATUS column: the menu only exists for Open and Overdue installments.
The message "This installment already has an issued charge. To issue another, cancel the current one or create a second copy." appeared. Someone else, or the automatic issuing, issued that installment's charge a moment earlier. Nothing was duplicated: reload the screen and the CHARGE column already shows the slip.
The menu appears, but there is no Issue Boleto. Two possibilities. Either the slip for that installment was already issued — in which case the CHARGE column already shows the link. Or the installment does not use payment slips, and the menu is offering the method it does use — along with Change to Bank slip, if the receiving account charges slips.
The student says the email never arrived. Check the email address on their record; a typo is the most common cause. Ask them to look in the spam folder. If it still has not arrived, copy the barcode line from the installment itself and send it over WhatsApp — the student can pay with it at any bank.
What if I issued the wrong installment
Only whoever administers the EduPay account can undo it: the same three-dot menu shows Cancel Charge for installments that already have a slip. But a slip cannot be cancelled before its due date. Until its validity date, the system refuses with the message "The current boleto is valid until dd/mm/yyyy, and Stripe does not allow cancelling a boleto before it expires…", and the slip remains payable — if the student pays it, the payment is recorded. After that date, the cancellation works.
Once cancelled, the installment shows the Charge cancelled on dd/mm/yyyy badge and is not issued again on its own. To resume billing, issue it again from the menu.
If the point is not to undo it but to change the amount or the date, the path is 2nd Copy, in the same menu — it issues a new slip with a new due date, without erasing the installment's history. The same rule applies here: while the current slip is still valid, the second copy is refused.
Reviewed on · view as plain text